Updated December 7, 2016
Handling Offline Actions in React Native
Originally publish on medium.com.

Want to learn more about building offline React Native apps? Check out the comprehensive class on it!
A few weeks ago I wrote about building offline first react native apps and left the post with a question — “How would you handle actions taken while offline and sync them with the server the next time the user uses the app while online?”
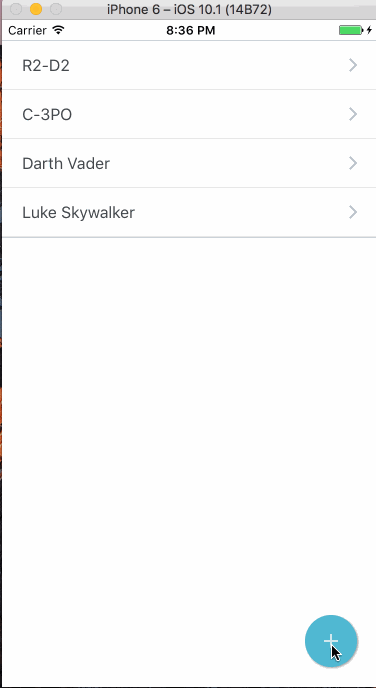
Today we’ll explore one, simple, answer to that question. It’s an extremely basic app. We press a button and fetch a person from the Star Wars API. When we press the button we increment the person index by one (so we don’t fetch the same person over and over) and if the user is offline then we put the requests into our redux store and, when the user’s connection is restored, we make all of the stored requests.
If you’re reading this and thinking there are a bunch of cases I’m ignoring, you’re right. This is the most basic it can be — hopefully serving as a starting point.
Getting Started
Since this post is a bit more advanced I’m going to be making some assumptions on what you know — a basic familiarity with Redux and React Native. You can access the full project on GitHub. Some of the prerequisite info has been covered in my previous post. Here’s an overview of the packages we’ll be using.
- lodash — it makes life easy
- react-native-elements — for basic styling
- react-native-vector-icons — icons
- react-redux — make using redux easy with react (native)
- redux-persist — to persist our store to disk
- redux-thunk — async redux actions
Now to save time I’m going to skip setting up the app — the list component, making the request, and basic redux config. All the changes to a default React Native app can be found in this Gist. With these changes we’re able to press the button and add the person to a list but it doesn’t have any offline functionality.
NetInfo
At the core of this we’ll be using the NetInfo API to detect whether or not the user has an internet connection. You can drill down into the details about the connection type with this api but we only care about whether or not the user is connected.
In order to track this we’ll be listening to the connection status and, upon change, writing the current status to our redux store.
With that in mind, let’s get to coding. First we’ll create an action that our component can call when the status changes.
app/actions.js
// ...

export const connectionState = ({ status }) => {
  return { type: 'CHANGE_CONNECTION_STATUS', isConnected: status };
};
And we’ll set up our reducer to handle that change and update the store accordingly.
app/reducer.js
const initialState = {
  ...
  isConnected: false,
};

const reducer = (state = initialState, action) => {
  switch (action.type) {
    ...
    case 'CHANGE_CONNECTION_STATUS':
      return Object.assign({}, state, {
        isConnected: action.isConnected,
      });
    default:
      return state
  }
}

export default reducer;
So now we need to listen to the network change. We’re also going to change the icon depending on the connection status AND make sure we subscribe to these pieces of data from our redux connect function.
Make sure that you remove event listeners upon unmount to avoid memory issues.
app/NameList.js
// ...
import { View, Text, ScrollView, NetInfo } from 'react-native';
import { requestPerson, connectionState } from './actions';

class NameList extends Component {
  componentDidMount() {
    NetInfo.isConnected.addEventListener('change', this._handleConnectionChange);
  }

  componentWillUnmount() {
    NetInfo.isConnected.removeEventListener('change', this._handleConnectionChange);
  }

  _handleConnectionChange = (isConnected) => {
    this.props.dispatch(connectionState({ status: isConnected }));
  };

  render() {
    return (
      <View style={{ flex: 1 }}>
        {/* ... */}
        <Icon
          raised
          name={this.props.isConnected ? 'add' : 'alarm-add'}
          color='#51b9d3'
          reverse
          onPress={() => this.props.dispatch(requestPerson({ index: this.props.personIndex }))}
          containerStyle={{ position: 'absolute', right: 20, bottom: 20 }}
        />
      </View>
    );
}
const mapStateToProps = (state) => {
  return {
    people: state.people,
    personIndex: state.personIndex,
    actionQueue: state.actionQueue,
    isConnected: state.isConnected,
  };
};

export default connect(mapStateToProps)(NameList);
Cool! So now our redux store will update as our connection state does and we can use that when we’re making remote requests. Speaking of which, let’s update our requestPerson so that it only makes the fetch when connected.
app/actions.js
import { NetInfo } from 'react-native';

export const requestPerson = ({ index = 1 }) => {
  return (dispatch, getState) => {
    const { isConnected } = getState();

    dispatch({ type: 'INC_PERSON_INDEX' });
    const url = `https://swapi.co/api/people/${index}?format=json`;
    if (isConnected) {
      fetch(url)
        .then((res) => res.json())
        .then((res) => {
          dispatch({ type: 'SAVE_PERSON', person: res });
        });
    } else {
      dispatch({ type: 'ADD_TO_ACTION_QUEUE', payload: url });
    }
  };
};
Now, as you see above, when we don’t have a connection we’re adding the endpoint to the store so we can fetch it later.
Upon connecting we’re basically doing the same thing as requestPerson but it’s a bit more basic.
- We don’t need to increment the number
- It will only be called when we’re connected (there are some cases where this might not be true but that’s out of scope) so we don’t need to check if we’re connected.
With those considerations in mind we’ll create a new action called requestPersonByUrl in our actions file.
app/actions.js
// ...

export const requestPersonByUrl = ({ url }) => {
  return (dispatch, getState) => {
    fetch(url)
      .then((res) => res.json())
      .then((res) => {
        dispatch({ type: 'SAVE_PERSON', person: res });
        dispatch({ type: 'REMOVE_FROM_ACTION_QUEUE', payload: url });
      });
  };
};
One addition there that we’re not yet handling in our reducer is the _REMOVE_FROM_ACTION_QUEUE — _let’s update the reducer to handle that. I’m using lodash to remove the url easily, regardless of it’s location in the array.
app/reducer.js.js
import _ from 'lodash';

// ..

const reducer = (state = initialState, action) => {
  switch (action.type) {
    // ...
    case 'REMOVE_FROM_ACTION_QUEUE':
      return Object.assign({}, state, {
        actionQueue: _.without(state.actionQueue, action.payload),
      });
    // ...
  }
};
Now to actually call all these functions! We’ll have to do this in the NameList component. It’s actually pretty simple — in our _handleConnectionChange we’ll check if we’re connected and if there are any url’s in our actionQueue if yes, then we’ll make the necessary requests.
app/reducer.js.js
class NameList extends Component {
  // ...

  _handleConnectionChange = (isConnected) => {
    const { dispatch, actionQueue } = this.props;
    dispatch(connectionState({ status: isConnected }));

    if (isConnected && actionQueue.length > 0) {
      actionQueue.forEach((url) => {
        this.props.dispatch(requestPersonByUrl({ url }));
      });
    }
  };
  // ...
}
Let’s check out what we’ve actually built. It’s simple but lays a solid foundation.
