Updated May 18, 2016
React Native Basics: How to Use the ListView Component
Originally publish on medium.com.
ListView — A core component designed for efficient display of vertically scrolling lists of changing data.
Basically it’s a way to create an efficient scrolling component. It’s driven by a data blob and, theoretically, can be infinitely long. Whereas the other core scrollable component, ScrollView, may run into performance issues for very long lists. ListView actually uses a ScrollView as it’s scrollable component behind the scenes, by default, so you can do all of this with a ScrollView if you want to build your own abstraction. ListView is an abstraction that adds a lot of nice things and optimization on top of ScrollView.
Basic Usage
So what’s the most basic way to use a ListView? You’ll need two things to effectively use this component: a ListView.DataSource and a renderRow function that returns a component.
A ListView.DataSource does a lot of things behind the scenes that allow us to have an efficient data blob that the ListView component can understand, all from a simple array. To start we’re just going to use it to handle the rows but you’ll see later on how we can use it for our section headers too.
The renderRow function simply returns a component that, well, renders the row. It’s passed the data for that row as a prop to the function. We’ll expand on that later.
You can see an extremely basic version of a ListView here:
ListViewDemo1.js
import React from 'react';
import { View, ListView, StyleSheet, Text } from 'react-native';

const styles = StyleSheet.create({
  container: {
    flex: 1,
    marginTop: 20,
  },
});

class ListViewDemo extends React.Component {
  constructor(props) {
    super(props);

    const ds = new ListView.DataSource({
      rowHasChanged: (r1, r2) => r1 !== r2,
    });
    this.state = {
      dataSource: ds.cloneWithRows(['row 1', 'row 2']),
    };
  }
  render() {
    return (
      <ListView
        style={styles.container}
        dataSource={this.state.dataSource}
        renderRow={(data) => (
          <View>
            <Text>{data}</Text>
          </View>
        )}
      />
    );
  }
}

export default ListViewDemo;
For the remainder of the tutorial I’ll be using a more robust data set, courtesy of Random User Generator. You can access my exact data set here.
Before going any deeper let’s break that renderRow function out into its own component and make it a little bit better looking.
ListViewDemo2.js
/*
 * Removed for brevity
 */

import Row from './Row';

class ListViewDemo extends React.Component {
  /*
   * Removed for brevity
   */
  render() {
    return (
      <ListView
        style={styles.container}
        dataSource={this.state.dataSource}
        renderRow={(data) => <Row {...data} />}
      />
    );
  }
}

export default ListViewDemo;
Row1.js
import React from 'react';
import { View, Text, StyleSheet, Image } from 'react-native';

const styles = StyleSheet.create({
  container: {
    flex: 1,
    padding: 12,
    flexDirection: 'row',
    alignItems: 'center',
  },
  text: {
    marginLeft: 12,
    fontSize: 16,
  },
  photo: {
    height: 40,
    width: 40,
    borderRadius: 20,
  },
});

const Row = (props) => (
  <View style={styles.container}>
    <Image source={{ uri: props.picture.large }} style={styles.photo} />
    <Text style={styles.text}>{`${props.name.first} ${props.name.last}`}</Text>
  </View>
);

export default Row;

Progress!
Separator
This is pretty straight forward — renderSeparator renders a separator between components in your list. Why create a different component rather than tacking on a border bottom on the component returned by renderRow? Because renderSeparator is smart! It won’t render the separator on the last element in the section. So how do we use it?
ListViewDemo3.js
/*
 * Removed for brevity
 */

const styles = StyleSheet.create({
  /*
   * Removed for brevity
   */
  separator: {
    flex: 1,
    height: StyleSheet.hairlineWidth,
    backgroundColor: '#8E8E8E',
  },
});

class ListViewDemo extends React.Component {
  /*
   * Removed for brevity
   */
  render() {
    return (
      <ListView
        style={styles.container}
        dataSource={this.state.dataSource}
        renderRow={(data) => <Row {...data} />}
        renderSeparator={(sectionId, rowId) => (
          <View key={rowId} style={styles.separator} />
        )}
      />
    );
  }
}

export default ListViewDemo;
So all we’re doing there is adding a style property for our separator and then adding renderSeparator to the ListView, which returns a valid React component. The rowId is passed as a prop in that function which works well for a key (otherwise RN will throw a warning).

Header
A header is, as you may have guessed, a component that is rendered at the top of your ListView. It’s guaranteed to always be the first thing. A good use case for this, in the context of our people list, would be a search bar. Let’s build it.
Header.js
import React from 'react';
import { View, Text, StyleSheet, TextInput } from 'react-native';

const styles = StyleSheet.create({
  container: {
    flex: 1,
    padding: 8,
    flexDirection: 'row',
    alignItems: 'center',
    backgroundColor: '#C1C1C1',
  },
  input: {
    height: 30,
    flex: 1,
    paddingHorizontal: 8,
    fontSize: 15,
    backgroundColor: '#FFFFFF',
    borderRadius: 2,
  },
});

const Header = (props) => (
  <View style={styles.container}>
    <TextInput
      style={styles.input}
      placeholder="Search..."
      onChangeText={(text) => console.log('searching for ', text)}
    />
  </View>
);

export default Header;
So that’s a very basic search bar (that doesn’t actually do anything). Let’s wire it into our ListView.
ListViewDemo4.js
/*
 * Removed for brevity
 */
import Header from './Header';

/*
 * Removed for brevity
 */

class ListViewDemo extends React.Component {
  /*
   * Removed for brevity
   */

  render() {
    return (
      <ListView
        style={styles.container}
        dataSource={this.state.dataSource}
        renderRow={(data) => <Row {...data} />}
        renderSeparator={(sectionId, rowId) => (
          <View key={rowId} style={styles.separator} />
        )}
        renderHeader={() => <Header />}
      />
    );
  }
}

export default ListViewDemo;

It’s not beautiful (I never said I was a designer) but we’ve now got a nice search bar that lives at the top of our ListView.
Footer
Much like the header sticks to the top of the list, the footer sticks to the bottom. This would be a good place to put a “Load More” button or, if you’ve got infinite scrolling, a loading indicator to keep up with the lightning scrolling of your users. Implementing this is going to be just like using a header. We’ll create our footer component then tell our ListView to render it.
Footer.js
import React from 'react';
import { View, Text, StyleSheet, TouchableOpacity } from 'react-native';

const styles = StyleSheet.create({
  container: {
    flex: 1,
    padding: 8,
    alignItems: 'center',
    justifyContent: 'center',
  },
  button: {
    borderColor: '#8E8E8E',
    borderWidth: StyleSheet.hairlineWidth,
    paddingHorizontal: 20,
    paddingVertical: 10,
    borderRadius: 5,
  },
  text: {
    color: '#8E8E8E',
  },
});

const Footer = (props) => (
  <View style={styles.container}>
    <TouchableOpacity
      style={styles.button}
      onPress={() => console.log('load more')}
    >
      <Text style={styles.text}>Load More</Text>
    </TouchableOpacity>
  </View>
);

export default Footer;
ListViewDemo5.js
/*
 * Removed for brevity
 */
import Footer from './Footer';

/*
 * Removed for brevity
 */

class ListViewDemo extends React.Component {
  /*
   * Removed for brevity
   */
  render() {
    return (
      <ListView
        style={styles.container}
        dataSource={this.state.dataSource}
        renderRow={(data) => <Row {...data} />}
        renderSeparator={(sectionId, rowId) => (
          <View key={rowId} style={styles.separator} />
        )}
        renderHeader={() => <Header />}
        renderFooter={() => <Footer />}
      />
    );
  }
}

export default ListViewDemo;

Looking more and more like… a list of people!
Sticky Section Headers
So this is a part that I think is really cool but sadly not very well documented. We can put our content into sections and label it appropriately. Our labels/section headers will then automatically stick to the top until the next section comes up during scrolling. I’m not going to cover what exactly is happening to create our data but if you want a deeper understanding I would suggest reading this blog post.
First, let’s create our SectionHeader component. This is the easiest part.
SecondHeader.js
import React from 'react';
import { View, Text, StyleSheet } from 'react-native';

const styles = StyleSheet.create({
  container: {
    flex: 1,
    padding: 8,
    justifyContent: 'center',
    backgroundColor: '#EAEAEA',
  },
  text: {
    fontSize: 13,
  },
});

const SectionHeader = (props) => (
  <View style={styles.container}>
    <Text style={styles.text}>{props.character}</Text>
  </View>
);

export default SectionHeader;
This next part is the most complex. I tried to write it out but couldn’t convey my point very well so I decided to just add comments to my code to hopefully get the point across. Please let me know if you’ve got any questions.
The gist of it here is that we’re taking our data and splitting it into sections, alphabetically. To do that we need 3 things: an array of row ids, an array of section ids, and an object representing our data. The data object will store whatever data should be passed to our row or section. The section ids array simply stores an array of strings that align with the appropriate key in the data blob. The array of row ids is actually an array of arrays. The top level aligns with the section ids and then the nested array holds the actual row id, again aligning with a key in the data object. Hopefully the annotations properly demonstrate what I’m trying to do.
ListViewDemo6.js
/*
 * Removed for brevity
 */

class ListViewDemo extends React.Component {
  /*
   * Removed for brevity
   */

  formatData(data) {
    // We're sorting by alphabetically so we need the alphabet
    const alphabet = 'ABCDEFGHIJKLMNOPQRSTUVWXYZ'.split('');

    // Need somewhere to store our data
    const dataBlob = {};
    const sectionIds = [];
    const rowIds = [];

    // Each section is going to represent a letter in the alphabet so we loop over the alphabet
    for (let sectionId = 0; sectionId < alphabet.length; sectionId++) {
      // Get the character we're currently looking for
      const currentChar = alphabet[sectionId];

      // Get users whose first name starts with the current letter
      const users = data.filter(
        (user) => user.name.first.toUpperCase().indexOf(currentChar) === 0
      );

      // If there are any users who have a first name starting with the current letter then we'll
      // add a new section otherwise we just skip over it
      if (users.length > 0) {
        // Add a section id to our array so the listview knows that we've got a new section
        sectionIds.push(sectionId);

        // Store any data we would want to display in the section header. In our case we want to show
        // the current character
        dataBlob[sectionId] = { character: currentChar };

        // Setup a new array that we can store the row ids for this section
        rowIds.push([]);

        // Loop over the valid users for this section
        for (let i = 0; i < users.length; i++) {
          // Create a unique row id for the data blob that the listview can use for reference
          const rowId = `${sectionId}:${i}`;

          // Push the row id to the row ids array. This is what listview will reference to pull
          // data from our data blob
          rowIds[rowIds.length - 1].push(rowId);

          // Store the data we care about for this row
          dataBlob[rowId] = users[i];
        }
      }
    }

    return { dataBlob, sectionIds, rowIds };
  }

  /*
   * Removed for brevity
   */
}

export default ListViewDemo;
Finally we need to use our formatData function and render our section headers.
ListViewDemo7.js
/*
 * Removed for brevity
 */
import SectionHeader from './SectionHeader';

/*
 * Removed for brevity
 */

class ListViewDemo extends React.Component {
  constructor(props) {
    super(props);

    const getSectionData = (dataBlob, sectionId) => dataBlob[sectionId];
    const getRowData = (dataBlob, sectionId, rowId) => dataBlob[`${rowId}`];

    const ds = new ListView.DataSource({
      rowHasChanged: (r1, r2) => r1 !== r2,
      sectionHeaderHasChanged: (s1, s2) => s1 !== s2,
      getSectionData,
      getRowData,
    });

    const { dataBlob, sectionIds, rowIds } = this.formatData(demoData);
    this.state = {
      dataSource: ds.cloneWithRowsAndSections(dataBlob, sectionIds, rowIds),
    };
  }

  /*
   * Removed for brevity
   */

  render() {
    return (
      <ListView
        style={styles.container}
        dataSource={this.state.dataSource}
        renderRow={(data) => <Row {...data} />}
        renderSeparator={(sectionId, rowId) => (
          <View key={rowId} style={styles.separator} />
        )}
        renderHeader={() => <Header />}
        renderFooter={() => <Footer />}
        renderSectionHeader={(sectionData) => (
          <SectionHeader {...sectionData} />
        )}
      />
    );
  }
}

export default ListViewDemo;
Notice the changes in constructor we have to format our data a bit differently to get everything to work with our sections. I’m not going to cover it in depth because it’s been the same for all of my projects to date and that configuration will likely work for you as well.
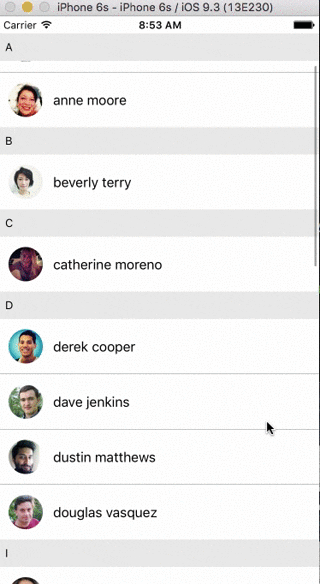
And there you have it! You’ve now got section headers that will stick to the header as you scroll through the section and be replaced as the next section is hit.
That’s the basics of using ListView. There are numerous other things you can do with it and I would suggest you checking out the docs for further information.
ListView Abstractions
Some of the things you’ll want to do with a ListView may already be done and open sourced. I’d suggest doing a bit of research to save some time!
